CNC lathe machining is a precision subtractive manufacturing process that uses computer-controlled programming to rotate a workpiece against a cutting tool, shaping it into a desired cylindrical form. This automated process is fundamental to modern manufacturing, enabling the high-speed, repeatable production of complex parts with exceptional accuracy. Whether you’re an aspiring machinist, an engineer, or simply curious about how things are made, this guide will walk you through the essential basics of CNC lathe machining, from its core principles to its practical applications.

Table of Contents
- What is a CNC Lathe and How Does it Work?
- Deconstructing the Machine: Key Components of a CNC Lathe
- Your First Cut: A Simplified CNC Lathe Setup Guide
- Mastering the Moves: Fundamental CNC Lathe Operations
- The Language of the Machine: A Beginner’s Look at CNC Programming
- Essential Safety Protocols for CNC Lathe Operation
- Where Do We Go From Here? Advancing Your CNC Machining Skills
- Conclusion: The Power and Precision of CNC Turning
What is a CNC Lathe and How Does it Work?
At its core, a CNC lathe, also known as a CNC turning center, is a sophisticated machine tool designed to create cylindrical parts. The process, called “turning,” involves securely holding a piece of raw material (like metal, plastic, or wood) in a rotating chuck. As the workpiece spins at high speed, a stationary cutting tool is moved along it by the machine’s computer, precisely removing material to achieve the final shape. Think of it as a highly advanced, automated potter’s wheel for hard materials.
Defining CNC Lathe Machining: From Concept to Creation
The term “CNC” stands for Computer Numerical Control. This means that instead of a human operator manually turning wheels and levers to guide the cutting tool, a computer program dictates every movement with microscopic precision. The “Lathe” or “Turning” part refers to the specific action of rotating the workpiece. This combination allows for the creation of intricate features like tapers, grooves, threads, and complex contours that would be incredibly difficult or time-consuming to produce by hand.
The Core Difference: CNC Lathe vs. Manual Lathe
While both CNC lathes and manual lathes perform the same fundamental operation, their capabilities and the skills required to operate them are vastly different. A manual lathe relies entirely on the skill and constant attention of a machinist. A CNC lathe, once programmed and set up, can run autonomously, producing identical parts for hours on end. This automation is the key differentiator.
| Feature | Manual Lathe | CNC Lathe |
|---|---|---|
| Control | Manual control via handwheels and levers | Automated control via a computer program (G-code) |
| Precision | Dependent on operator skill; typically lower | Extremely high and consistent, often within microns |
| Repeatability | Low; each part is unique | Very high; produces thousands of identical parts |
| Complexity | Limited to simpler geometries; complex shapes are difficult | Can easily produce highly complex contours and features |
| Operator Skill | Requires extensive hands-on machining skill | Requires programming, setup, and process monitoring skills |
| Production Speed | Slower; suitable for one-offs and small batches | Much faster; ideal for medium to large production runs |
An Overview of the CNC Turning Process
The journey from a digital idea to a physical part follows a structured workflow. Understanding this four-step process is key to grasping how CNC lathe machining works.
- The Digital Blueprint (CAD Design): The process begins with a 2D or 3D model created in Computer-Aided Design (CAD) software. This digital file is the exact blueprint for the final part.
- Translating the Design into Instructions (CAM & G-Code): The CAD model is then imported into Computer-Aided Manufacturing (CAM) software. The CAM software generates the toolpaths and translates them into a program called G-code, the specific language the CNC machine understands.
- Machine Setup and Preparation: A skilled operator prepares the CNC lathe. This involves loading the G-code program, securely clamping the raw material (workpiece) in the chuck, and installing the necessary cutting tools into the tool turret. Critically, the operator must set the machine’s reference points so it knows exactly where the workpiece and tools are located.
- Automated Machining Execution: With the setup complete, the operator closes the safety doors and starts the program. The CNC controller reads the G-code line by line, commanding the spindle to rotate, the coolant to flow, and the tool turret to move along the X and Z axes to cut the part. The operator monitors the process to ensure everything runs smoothly.
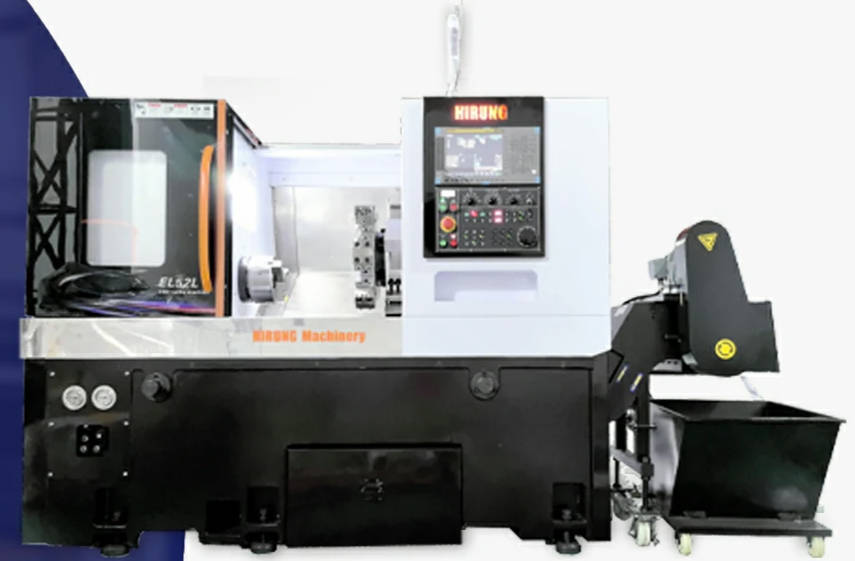
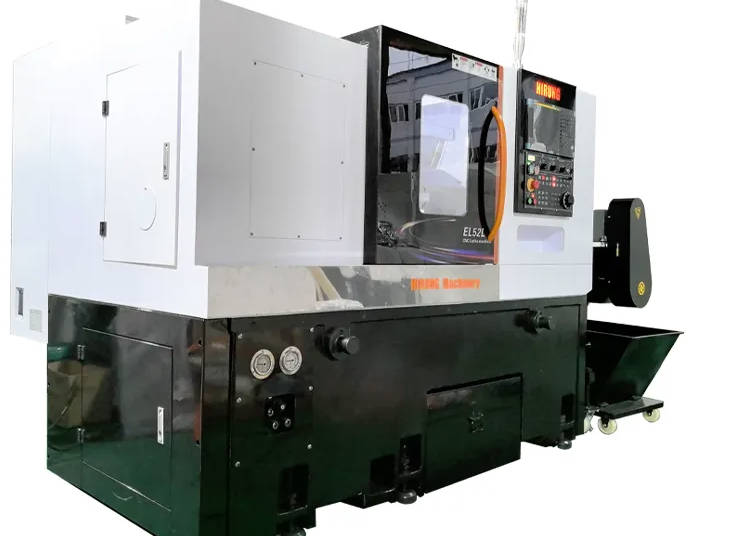
Deconstructing the Machine: Key Components of a CNC Lathe
To truly understand CNC turning, it’s essential to know the machine’s anatomy. Each component plays a critical role in the machine’s ability to hold, rotate, and cut the workpiece with precision.
The Heart of Rotation: Headstock, Spindle, and Chuck
These components work together to provide the rotational force of the machine. The headstock is the main body that houses the primary motor and drive system. The spindle is the shaft that rotates, driven by the motor. Attached to the end of the spindle is the chuck, which is the mechanical vise that physically grips the workpiece. 3-jaw chucks are common for round stock, while 4-jaw chucks allow for holding irregularly shaped parts.
The Support System: Bed and Tailstock
The bed is the heavy, rigid base of the lathe, upon which all other components are mounted. Its mass and rigidity are crucial for absorbing vibration and maintaining accuracy. The tailstock is a movable component that sits on the bed opposite the headstock. Its purpose is to provide support to the free end of a long workpiece, preventing it from flexing or vibrating under the pressure of the cutting tool. It is not always used, but it is indispensable for long, slender parts.
The Cutting Action: Carriage, Cross-Slide, and Tool Turret
This assembly is responsible for moving the cutting tool. The carriage travels along the length of the bed (Z-axis). Mounted on the carriage is the cross-slide, which moves perpendicular to the bed (X-axis). Together, these two axes allow the tool to be positioned anywhere along the workpiece’s profile. Mounted on the cross-slide is the tool turret, an indexable disc that holds multiple cutting tools. The CNC controller can automatically rotate the turret to bring the correct tool into position for different operations, such as turning, drilling, or threading, all within a single program.
The Brain of the Operation: The CNC Controller
The CNC Controller is the computer and interface that runs the entire machine. It consists of a screen, a keyboard, and various buttons and dials. The controller is where the operator loads the G-code program, makes setup adjustments, and monitors the machine’s status. It interprets the program and sends precise electrical signals to the motors that drive the spindle, carriage, cross-slide, and tool turret, orchestrating the entire machining ballet.
Mastering the Moves: Fundamental CNC Lathe Operations
A CNC lathe can perform a variety of cutting operations to shape a part. These fundamental techniques are the building blocks for creating almost any cylindrical component.
Shaping the Outside: Turning and Facing
Turning is the most common lathe operation. It involves moving a tool along the side of the workpiece to reduce its diameter to a specific size. Multiple passes may be required, starting with a roughing cut to remove large amounts of material, followed by a finishing cut for a smooth surface. Facing is the process of moving the tool across the end of the workpiece to create a flat, smooth surface and set the part’s overall length.
Creating Internal and External Features: Drilling, Boring, and Threading
Lathes are not just for outside surfaces. Drilling on a lathe is done by advancing a drill bit (held in the tool turret) into the center of the rotating workpiece. Once a hole exists, it can be enlarged to a very precise diameter using a boring bar. Threading is the process of cutting helical grooves to create screw threads. This can be done on the outside of a part (external threading) or the inside of a hole (internal threading) using a specialized threading tool.
Specialized Cuts: Grooving and Parting
Grooving involves plunging a specifically shaped tool into the workpiece to create a channel or “groove.” This is often done to create O-ring seats or reliefs for threading tools. Finally, parting, or cutting off, is the last operation. A thin, blade-like tool is plunged into the workpiece to sever the finished part from the original bar stock.
The Language of the Machine: A Beginner’s Look at CNC Programming
While modern CAM software automates much of the programming, understanding the underlying language—G-code and M-code—is invaluable for any machinist. This code is the set of instructions that tells the machine exactly what to do.
What are G-Code and M-Code?
CNC programs are a series of code blocks, with each block containing commands for the machine. These commands are primarily categorized as G-codes and M-codes.
- G-Code (Preparatory Functions): These codes tell the machine how to move. They define the geometry of the toolpath. Common G-codes include G00 (Rapid Move), G01 (Linear Feed Move), G02 (Clockwise Arc), and G03 (Counter-Clockwise Arc).
- M-Code (Miscellaneous Functions): These codes control machine functions that are not related to movement. They turn things on and off. Common M-codes include M03 (Spindle On, Clockwise), M05 (Spindle Stop), M08 (Coolant On), and M30 (End Program).
Understanding the Cartesian Coordinate System in Turning
A CNC lathe operates on a two-axis coordinate system. It’s crucial to understand this orientation:
- The Z-axis: Runs parallel to the spindle. Moving towards the chuck is typically Z-negative, and moving away is Z-positive. The face of the part is often set as Z0.
- The X-axis: Runs perpendicular to the spindle. It controls the diameter of the part. On most lathes, moving the tool towards the centerline is X-negative, and moving away is X-positive. The centerline of the spindle is always X0.
Your First Cut: A Simplified CNC Lathe Setup Guide
Disclaimer: The following is a generalized overview. Always consult your machine’s manual and receive proper training before operating any CNC machine. Safety is paramount.
The setup process bridges the gap between the digital program and the physical machining. Accuracy here is non-negotiable.
Step 1: Securely Mounting the Workpiece
The raw material, or stock, must be clamped firmly and concentrically in the chuck. A poorly secured workpiece is a major safety hazard and will result in an inaccurate part. Ensure the stock is seated properly against the chuck jaws.
Step 2: Installing and Touching Off Tools
Each tool is loaded into its designated pocket in the turret. The machine then needs to know the exact size and position of each tool’s cutting edge. This process is called “touching off” or “setting tool offsets.” A tool presetter or a probe is used to measure the distance from a known reference point to the tip of each tool along the X and Z axes. This data is saved in the controller’s offset library.
Step 3: Setting the Work Zero (G54)
The G-code program is written relative to a zero point on the part, not the machine. The operator must tell the machine where this “work zero” is located. For turning, this is typically the center of the workpiece face (X0, Z0). The operator will carefully touch a tool to the face of the part and tell the controller “this is Z0.” The X0 is almost always the spindle’s centerline, which is a fixed machine parameter.
Step 4: Running the Program Safely
Before pressing “Cycle Start” on a new setup, machinists use several safety features to prevent crashes. A dry run involves running the program high above the part to verify the toolpaths visually. Using single block allows the operator to execute the program one line at a time. Finally, running the program with the rapid and feedrate overrides turned down allows for more reaction time if something goes wrong.
Essential Safety Protocols for CNC Lathe Operation
CNC lathes are powerful and potentially dangerous machines. Adhering to strict safety protocols is non-negotiable.
- Personal Protective Equipment (PPE): Always wear safety glasses. Never wear gloves, loose clothing, jewelry, or long hair that could get caught in the rotating spindle.
- Machine Guards: Keep all safety doors and guards in place and closed during operation. Modern machines have interlocks that prevent them from running if a door is open.
- Awareness: Be aware of the machine’s movements at all times. Never place your hands inside the machine while it is powered on or running a program.
- Emergency Stop: Know the location of the emergency stop button and do not hesitate to use it if you suspect a problem.
- Proper Setup: Double-check that the workpiece and tools are securely fastened before starting any operation.
Where Do We Go From Here? Advancing Your CNC Machining Skills
Learning the basics is just the first step on a rewarding journey. To continue your education, consider these resources:
- Online Simulators: CNC simulation software allows you to write, test, and visualize G-code programs on your computer without risking a real machine.
- Courses and Certifications: Many technical colleges and online platforms like Coursera or Udemy offer courses in CNC operation and programming.
- Books and Communities: The “Machinery’s Handbook” is an indispensable reference. Online forums like Practical Machinist and Reddit’s r/machinists are vibrant communities for asking questions and learning from experts.
- Hands-On Experience: Seek out opportunities at local makerspaces, vocational schools, or through apprenticeships to gain invaluable hands-on experience.
Conclusion: The Power and Precision of CNC Turning
CNC lathe machining is a cornerstone of modern manufacturing, blending digital design with physical creation. By understanding its fundamental principles—the machine’s components, the basic turning operations, the programming language, and the critical setup procedures—you have built a solid foundation of knowledge. This technology empowers us to create the precise, complex, and repeatable components that drive our world, from aerospace and automotive parts to medical implants. The path to becoming a proficient machinist is one of continuous learning, but with these basics mastered, you are well on your way.